
|
My Goodness!!! It's been a crazy busy couple of months for me...! I have taken on several Freelance Graphic Design projects as well as been busy with school coursework - both of which have kept mevery much on my toes.
I hope to be back to presenting some more Daily Doodles with you all soon, now that I'm getting all caught up. And... That's also not to say I stopped doodling during these past 6-8 weeks either. In fact, I have kept busy creating a few things here and there, and I'm always practicing with pen an paper to create new designs, as well as taking the time to watch various tutorials and even find inspiration from some of the great works posted on Facebook. So with that, now you all know I haven't dropped off the face of the earth or anything. I've just been bsuy with life and all the great adventures it has to offer. See you again soon with some new Daily Doodles! Keep Creating, Keep Smiling, Keep Dreaming~ -(tif)-
0 Comments
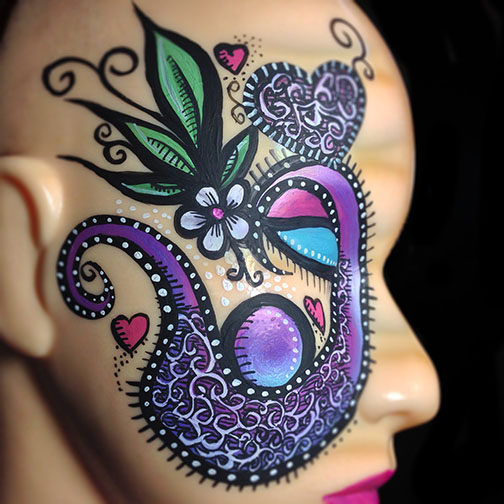
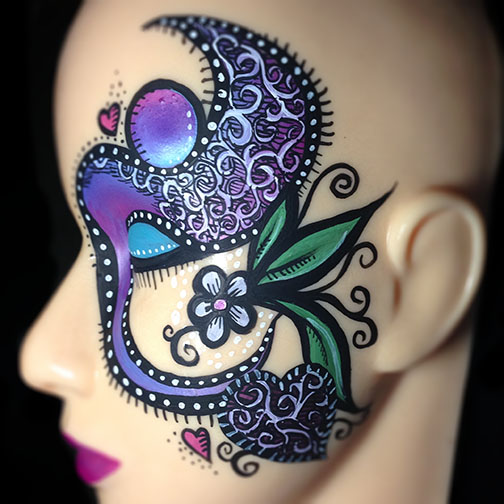
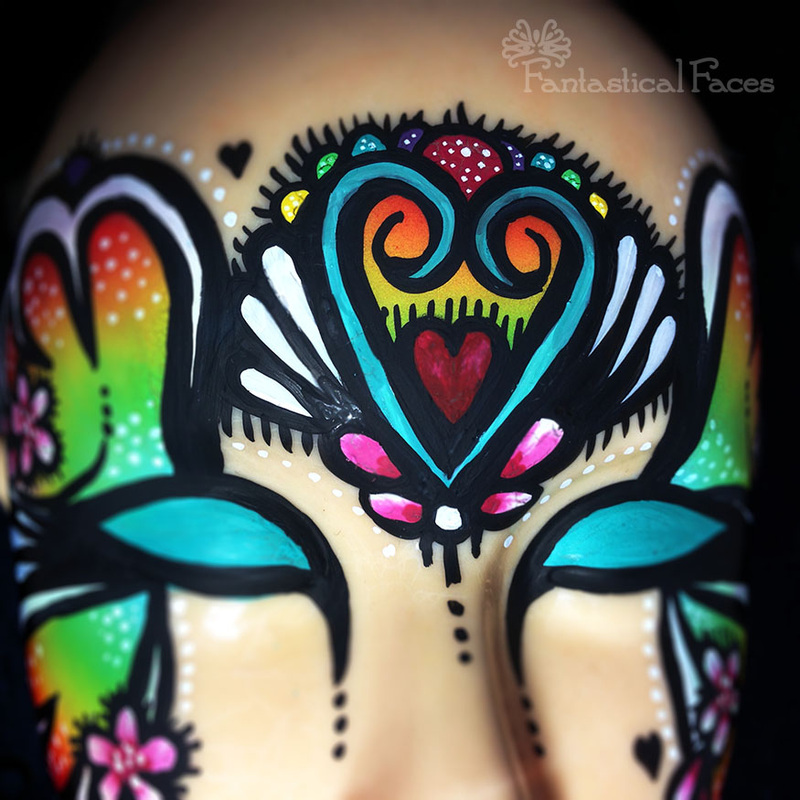
So here we are about 2 weeks since my last post, but let me tell you, I haven't stopped doodling since then; I just haven't had time to post any of them. My days these past few weeks have been filled with planning a big EXPO for work, taking more Graphic Design courses, and doing face painting at events and parties. There's literally been no time to sleep! Today, I was finally able to catch my breath this weekend and catch you up on some of the doodles I created over the past couple weeks - so sit back, and enjoy the colorful loveliness that will be forthcoming over the next few days as I get all of these lovelies uploaded. My first design is an asymmetrical mask with a Valentine's Day theme to it. 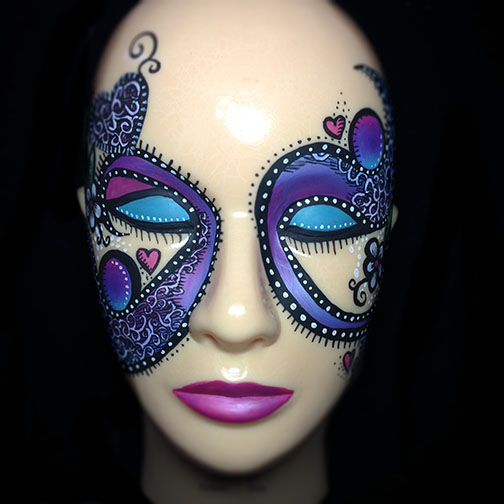
For this design, I just focused on colors. There was really no inspiration as for a photo or image, I just wanted to make it bold and colorful. I used a split cake I made featuring metallic fuchsia, purple, and teal (All Global) both as a one stroke, as well as for a pouncer to create the circle shapes. Then I got to play around with my new Loew-Cornell Dagger brush that I purchased at Silly Farm a few weeks ago. I was excited to try it out for the leaves as it really lends itself nicely to create contrasting lines weights. I LOVE this brush and hope to add some more in various shapes and sizes to my arsenal. Perhaps one day I'll create a doodle using only this brush (it makes really neat teardrops too!) It's so versatile and I want to use it all the time now! (I used the greens from the Fleur split cake by Paradise for the leaves - loading the brush by the edge similar to how you load a normal flat brush.) The other paint I used is the Chameleon Plum Fairy for the larger lacy hearts (that I purchased from Paintertainment), and Wolfe black and white for the details. The "Plum Fairy" color from Chameleon is my first item from their line. I had never used their paints before; this color just popped at me when I saw it. It is great paint to work with; similar to Wolfe, and very easy to control. (I think Chameleon is going to become a new favorite of mine.) After laying down the base color with a 3/4" paradise Flat Brush, I added the flowers and hearts using a Loew-Cornell Filbert brush, the leaves were created with the Chisel Brush, the thick to thin inky black lines and dots with a Loew-Cornell #1 brush, and lastly the white details and dots were also created with a Loew-Cornell #1 brush. So there you have it... Another daily doodle for your to enjoy. More doodles will be coming in the upcoming days ~ so check back here or follow me on my Facebook page. Keep creating, keep smiling, keep dreaming~ -tif- My apologies that it's been longer than usual since I last posted. The past week has been full of work for my regular day job, and I started up with school again on Friday - So it's been nothing but "Go, Go, GO!" for me. I did manage for finish thisbeauty for a "Tag! You're It" practice group found on the Face Paint Forum on Saturday. I was tagged with the random theme by a fellow forum member of "Northern Lights" and chose to mimic all the colors found in the Northern Lights with silhouettes of the landscape and a large owl flying forward. For this lovely, I used several one-stroke cakes; both Tag and Silly Farm, and Wolfe White and Global Dark Blue. I chose to challenge myself on this one with using only the dark blue and no black to create the silhouettes. It was a fun challenge, and I absolutely LOVE the Global dark blue. It's gorgeous and dries with a hint of purple sheen to it. It's almost like a dark indigo blue really. Additionally, I finally found a 3/4 flat brush that I absolutely love. I have been through several already and found them hard to control, so I picked up one of the Paradise flat brushes from Paintertainment last week and it is AWESOME! I plan to pick up a few more so I don't have to continually clean the one brush all the time and muddy up my rinsing water; especially when the one-stroke cakes contain dark colors. (Note: Of course, I'm still having some struggles fighting the hairspray coating on my practice head causing my paint to crack, but I'm learning to embrace it rather than despise it.) With that, below please find my latest design... 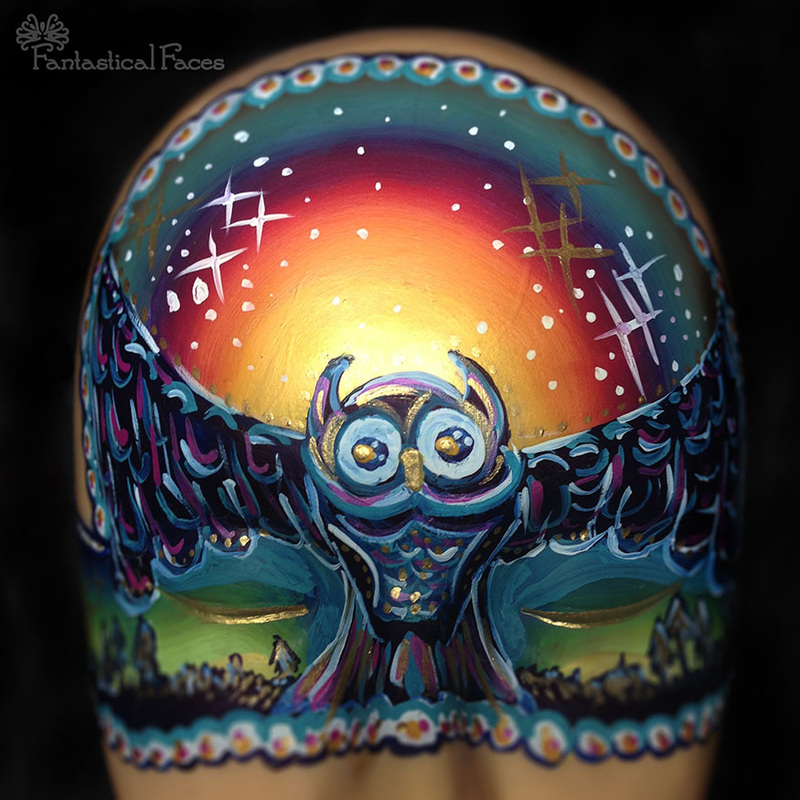 I got the owl idea from a silhouette image when I did a Google search for "Northern Lights Drawings", though to my pleasant surprise this morning, I found that another great painter out there had created a similar style of owl as a mask who shared their work on Facebook. (Great minds think alike, eh?!) As I am not one to step on anyone's toes, I have to give props to Léa Shelley who created a gorgeous Owl Mask along the lines of what I did - Similar in our ideas, but completely personalized in our own styles with the execution). So here's a "Shout Out" to Léa aka "The Tattooed Lady". (You can also find her page on Facebook.) She is a very talented face painter from Canada, and you can also find some great video tutorials of her work on YouTube too. Check out her work people! It's awesome! :) With that, my friends out there in InternetLand, I bid you all farewell until the next installment of my Daily Doodles. Have a great week! Keep creating, keep smiling, and keep dreaming~ -tif- Hello everyone out there in Internetland... I had a very full weekend this past weekend~ I worked on building a new kit and case for all my supplies. I happened across an old Yamaha keyboard case of mine from when I was doing the whole "musician" thing about 10 years ago, and thought it would be perfect to trick out with a new lining and organizing bins,; complete with Velcro so I can easily move stuff around. It was a huge endeavor, but I am pretty proud of my first attempt at making a personalized case. (I'll share pictures in a future blog once i get all the bugs worked out.) Anyway... I decided to do something with a Valentines theme to it for this next doodle. I again worked on my awesome practice head from The Classy Clown/Midwest Fun Factory as I want to get better at using it for practice doodles. (My arm is only so big and doesn't always allow me as much freedom.) I started out sponging on some color from the Wolfe Rainbow cake in a butterfly pattern, but I wanted it to be more of e "Butterfleur" or "Butterflower" as I just like flowers so much. I had the same hurdles with the paint cracking a bit against the hairspray coating; especially the white, but decided to not let that deter me from doing my design. So here are some pics & below them you will find the details of the paints/brushes I used.
I used ALL Wolfe Paint for this lovely: Wolfe Rainbow Cake, colors from the Wolfe Essentials Palette, and, of course, Wolfe White & Black. Aside from the Wicked petal-shaped sponge I used to lay down the color from the rainbow cake (they're awesome sponges by the way), I used all round brushes- my favorite Loew-Cornell's in various sizes ranging from #1 to #5, along with a Wolfe #1 round brush for doing the black outlines. (All of these items can also be purchased at The Classy Clown/Midwest Fun Factory as well.)
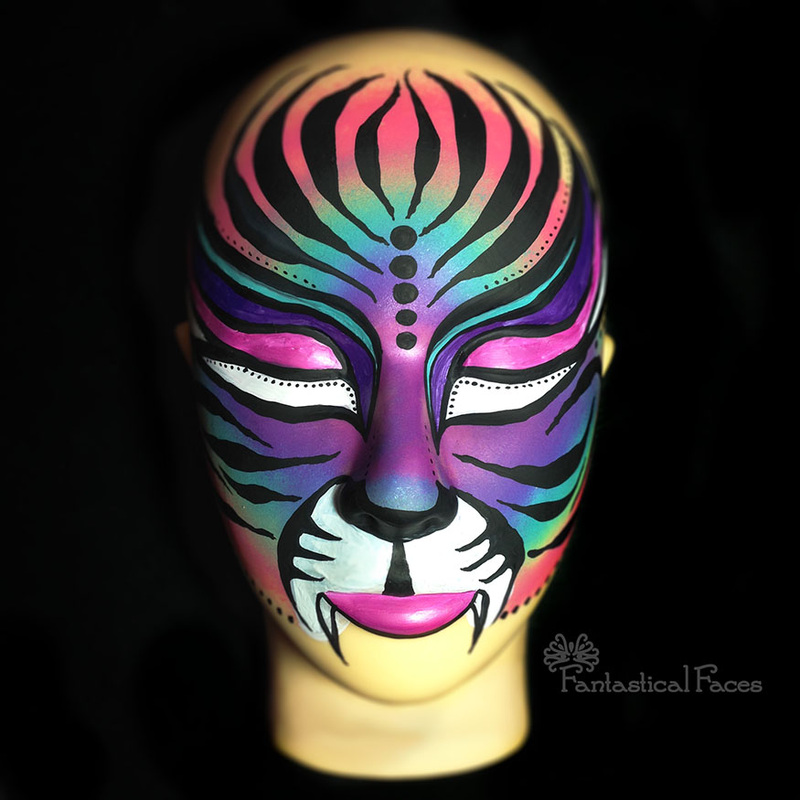
As you can see by the pics, there is some random paint cracking in places due to the hairspray, and in some cases I the paint was laid on a little thicker to cover up some of the cracking, but I was pleased with the final outcome in the end. (Again, the practice head cleaned up beautifully too!) So now I have prepped my practice head once again for my next installation that I hope to bring you in the next day or two, and even ordered a second head this week so I can have more than one head to practice on at a time; just because sometimes I get painting and I can't stop. With that, I'll bid you Adieu for now & look forward as always to your comments, insights, ideas, feedback etc. Have a great week & I'll be back soon with the next installment. Baubles, bangles, bubblegum, and glitter galore! -tif- Happy Friday Everyone! Last week I ordered my very first practice head and received it in the mail earlier this week. (Thanks to the lovely Mirae at The Classy Clown/Midwest Fun Factory for the practice head. Only $25 people!!! Plus she sends free glitter with every purchase!) Since rainbow tigers seem to be all the rage lately, I decided to try my hand at it. But first, I needed to make a rainbow cake. Since I'm still in the early stages of my "revisited" face painting career, I have been pretty much using smaller palettes (Wolfe Essentials Palette, Wolfe Metallix Palette, and the Mehron Paradise Palette with 26 colors). I have also not had the opportunity to try out other paint brands or attempted to make my own rainbow cakes. EEEK! With that, I took a journey over to The Face Paint Forum Shop to try out some Global paints to make some rainbow cakes. (They have a HUGE selection and great prices on their Global paints!) So, since I could get a nice variety at low cost, I figured, if I made any mistakes cutting them up for my rainbow and split cake trials, I wouldn't be out a huge chunk of change. :) Though typically most rainbow cakes vary from 4-6 colors, as I cut the strips a little too thin, I ended up with 7 colors in mine. Bit, I figured with the variety I put together, the cake would not only work well for sponging application, but also double as a good one-stroke variety as well. (The Global colors I used: Pink, Yellow LT, Teal, Pearl Baby Blue, Lilac, Pearl Magenta, and Pearl White.
THE PROCESS....
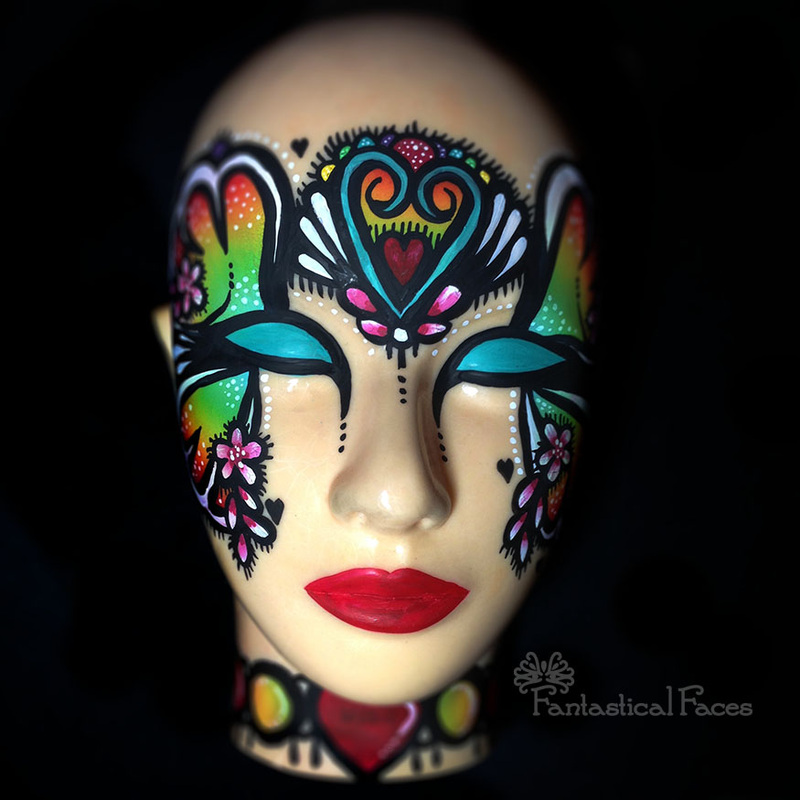
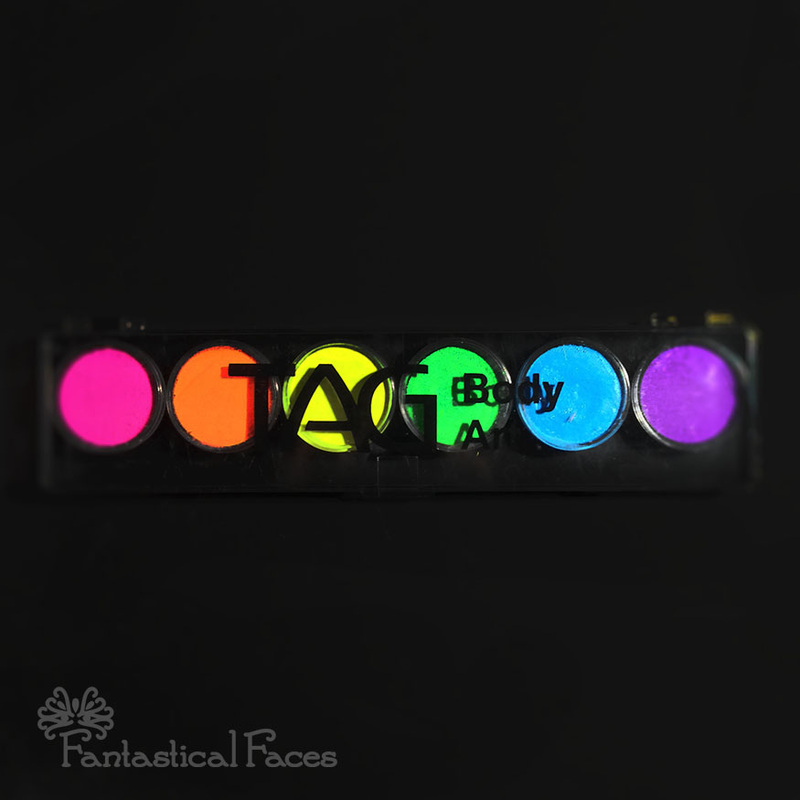
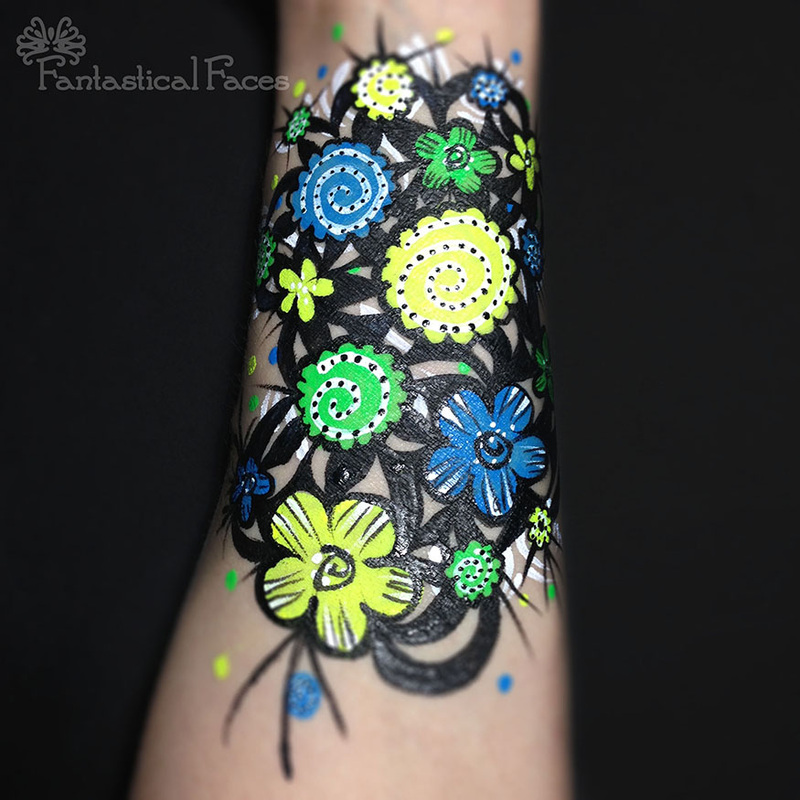
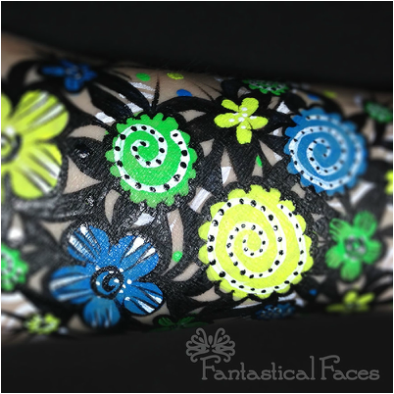
So I began the process of first giving my practice head 2 coats of hairspray~ I gave it a first coat, then went on to start making my rainbow cake while it dried, then went back and gave it a second coat while I prepped all my supplies for the Rainbow Tiger task at hand. I pulled some inspiration from a Rainbow Tiger tutorial that Lisa Joy Young had on YouTube but, as always, gave it my own "Fantastical" touch (I love making dots!) As I began working on the practice head (which I thought would be super easy) I realized it was going to take some getting used to. Sure, the practice head is stationary and doesn't wiggle in a seat, but there are still those awkward angles to reach, and that double coating of hairspray loved to make laying down the sponged color from my new rainbow cake a sticky process, as well as making my Wolfe White crack like crazy when it dried. But, I ventured onward... I also took this opportunity to play around with various round brushes I had in my arsenal to see the different results I got when doing the tiger stripes and adding detail. (My favorites are still the Loew-Cornell round brushes.) So, without all the hurdles of sticky hairspray affected areas and cracking paint, this design would have taken me less than 10 minutes. Unfortunately, in the end, it took about 30 minutes to complete - likely in part to the fact I had never painted on a practice head before as well as fighting the stickiness and cracking white paint. :) In the end, aside from all the hairspray issues and cracking paint, I'm pretty happy with the results for a first time ever using a Practice Head AND painting a Rainbow Tiger. (It's only going to get better from here on in. Yay!) I also ordered a second practice head today, just so I can have the opportunity to practice up to 2 designs each evening, or use one for my "rough draft" and the other for my "final presentation". So there you have it - a double dose of first times from yours truly. :) With that, I bid you all a good evening and wish you a fun-filled weekend. As always, feel free to post comments below, send me a message, ask questions, share inspiration, insight, etc. etc. I love hearing from you all! Baubles, bangles, bubblegum & Glitter Galore~ -tif- Yeah! We turned it up to 11! Though seriously, I took a step aside from my usual daily doodles today, to dedicate my doodle to all of those in France while they face this terrible and difficult time after the brutal massacre of the employees of the satirical magazine, Charlie Hebdo. Sending my love and prayers to you from the USA as you stand together to confront the pure evil that is terrorism, and refusing to give up and let it control your lives. Those that were lost are truly heroes to all of us artists. Their willingness to express themselves openly touches those of us who are writers, painters, and artists alike, and let's the world know~ We refuse to be silenced from expressing ourselves through our art. Vive la France! 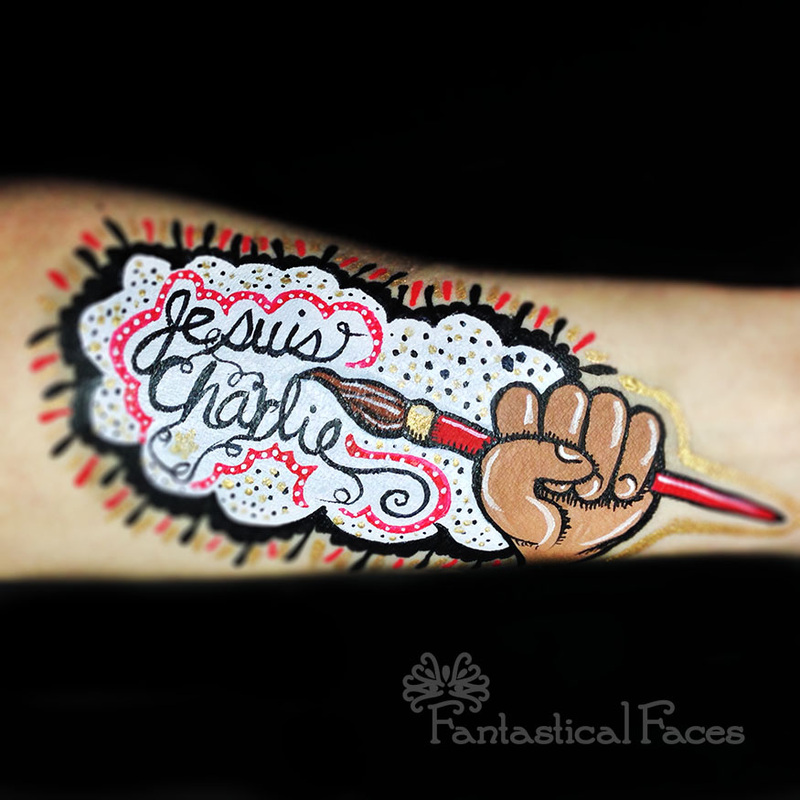 Hello all~ Well, we've hit the double digits for the Daily Doodles. Yay! It's been a crazy few days, with loading up Fantastical Flowers in my Store, to continuing to fight off this flu/virus/ick that I have had for going on 10 days. Though I did manage to squeeze in a little doodle time last night to share with you all. As I had absolutely NO neon colors in my arsenal yet, I decided to try out the TAG neon palette. I purchased it from the lovely Mirae from The Classy Clown/Midwest Fun Factory. First off, this palette was much bigger than I expected. (A pleasant surprise.) And I love how each color pot is capped and removable from the palette for those of use who like to hold cakes while we're painting. (Such as I do.) And the paints are VERY vibrant. This is my first venture into TAG products. (Up until this palette, I had only used Wolfe and Paradise.) I had read tutorials regarding various neon paints prior to purchasing this, so I was aware that all neons, regardless of brand, tend to apply a little less opaque than standard colors. That said, I loved the consistency of the cakes, (their consistency is comparable to Wolfe paints), they had no smell or odor, and were quite easy to control.
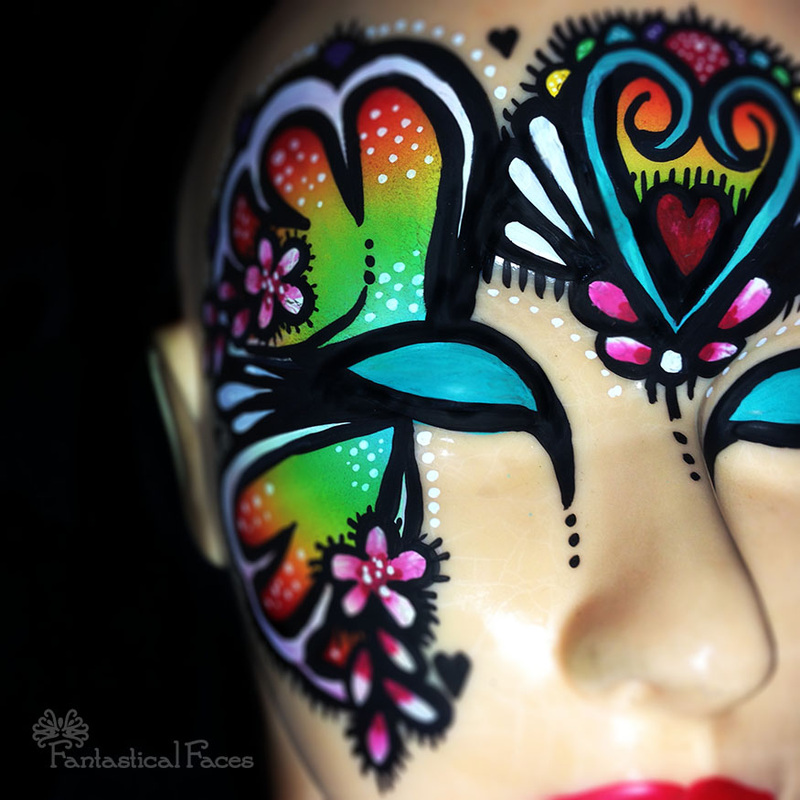
For this doodle, I chose to use the Yellow, Green, and Blue from the palette (as it is well known that Pink, Orange, and Purple are typically the favorites among girls and tend to run out the fastest.) I also added some Wolfe White and Wolfe Black to the design as well. As the palette also included 2 brushes, a small flat brush and a #3 round brush, I wanted to see if the TAG round brush was comparable to the round brush included in my Wolfe Essentials palette (that I absolutely LOVE!) It wasn't. You will see that I had included some white teardrops that I created using the #3 round brush that came with the palette, but I didn't care for how hard it was to control and the bristles splayed very easily - thus I really didn't like how they turned out. So, I chose to go a different route, using my handy Wolfe black along with a new Loew-Cornell brush #1 Round Brush that I also purchased from The Classy Clown/Midwest Fun Factory. I randomly drew lines between each element and then alternated blank and colored in spaces between them with the black. In doing this, I definitely provided myself some new inspiration for future designs; I loved how it turned out. Here are the pics:
As you can see, there are little tidbits of white poking through; my attempts at teardrops with a not-too-impressive round brush, but they still added a nice little accented touch to the piece I think.
Anyway, there you have it~ my latest and greatest! I hope you enjoy it as much as I did painting it! :) I'll be back again soon with another Daily Doodle! Keep creating, keep smiling, keep dreaming~ -tif- Greetings everyone & Happy 2015! My apologies for getting a little off track and missing out on posting for a couple days~ This virus I have been fighting for the past 8 days chose to take a turn for the worse on New Years Day & I have been pretty much laid up since then. But, I did manage to complete a Daily Doodle for you all from my bedside on New Years Day; I just haven't really been up for much blogging the past couple days as I preferred to lay low. That said, here's my attempt at painting from my sick bed on New Years Day... 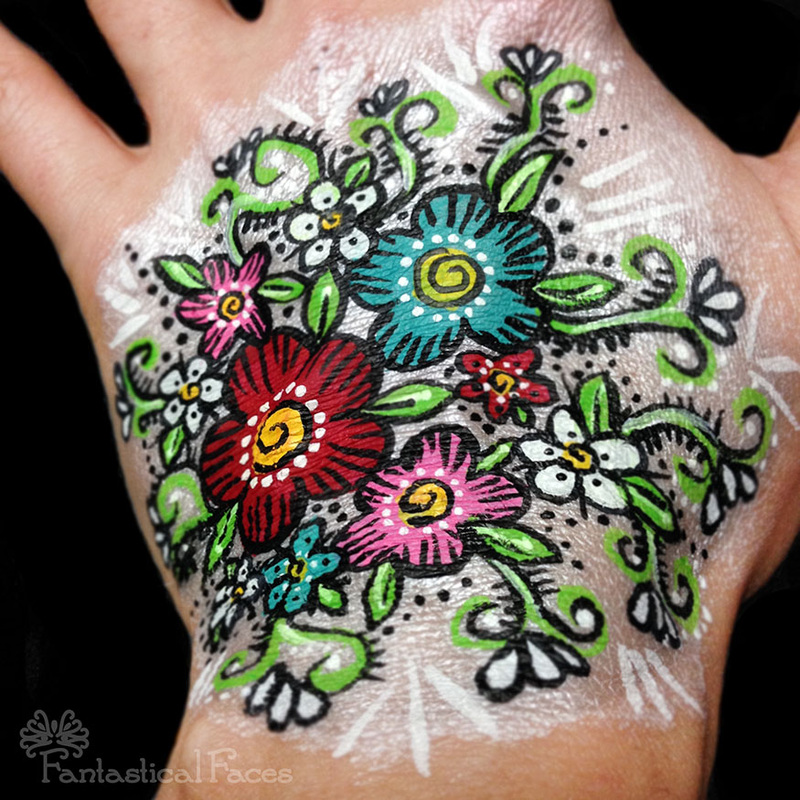 It's a little rough around the edges; my bedroom does not provide the best light and it's quite a challenge to paint while you're laying in bed ~ that's for sure! I hope the colorful flowers lend themselves to brightening your day. I enjoyed making them. I'll be back tomorrow with another installment ~ Today I'm focusing on getting my Fantastical Flowers Website Storefront up and running today. I'm working to post about 15 flowers today with another handful tomorrow.
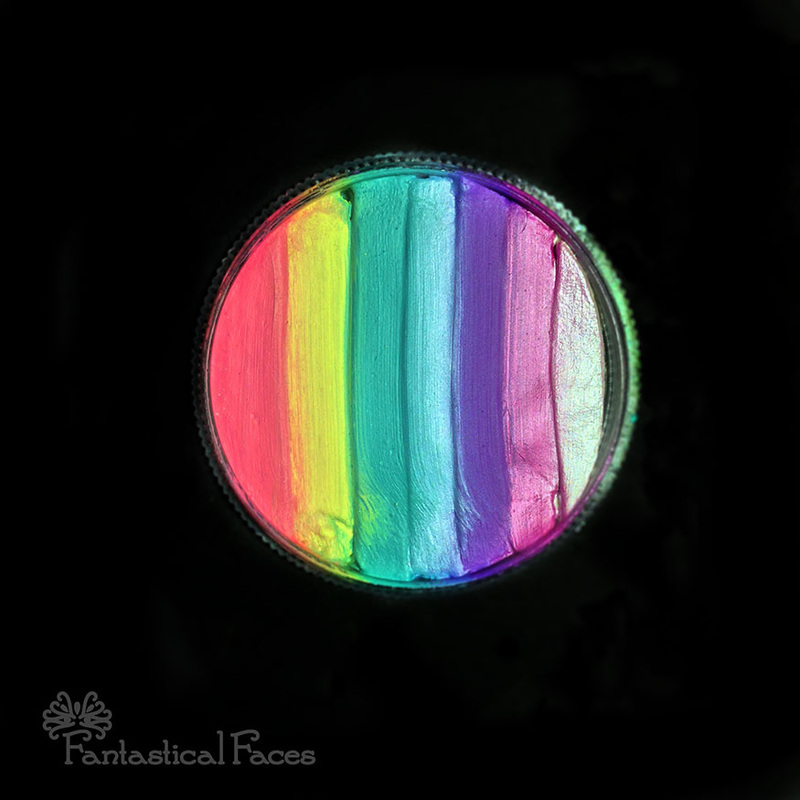
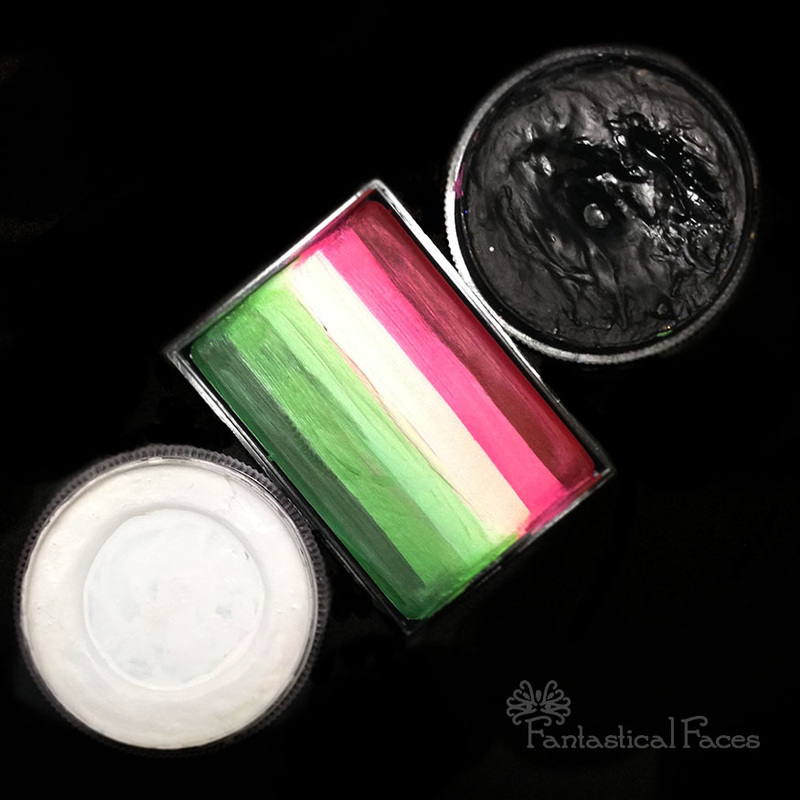
(Supplies used: Wolfe FX Essentials Palette, Wolfe Metallix White, Loew-Cornell, Royal Majestic, and Wolfe Round Brushes, Wolfe Sponge for Metallix White Background all available at these fine shops: Silly Farm | The Classy Clown | Paintertainment | Face Paint Forum Shop | Wolfe FX Keep creating, keep smiling, keep dreaming~ -tif- p.s. If you are a shop owner who would like an item or product(s) highlighted in one of my Daily Doodles, feel free to Contact Me to discuss products & design ideas. (Link, logo, etc. would be included when highlighting products from specific shops.) Yippeee!!! We're closing in on the double digits for my Daily Doodles! For today's installation, I thought about doing something with a New Years Eve theme, but as I received a new Fleur Paradise Prisma Cake in the mail from Silly Farm today, I chose to play with that instead. My weakest skill in the world of Face Painting & Body Art is definitely the whole Rainbow Cake, Split Cake, and One Stroke Cake phenomenon. My previous face painting experience, almost 2 decades ago, never included anything like them. You mixed and blended your own colors, that's just how it worked. (Call me old school... Just don't call me old. Besides, I'm not that old really ~ It will be at least another 20 years before my age makes me eligible to become a crazy cat lady. Moving on...) As I mentioned, I got this awesome Fleur Paradise Prisma Cake today. As far as split cakes & one stroke cakes, I really only have about 6-7 at this point as I'm still learning all about using them. (As I mentioned, it's my weakest skill as far a face painting goes~ and not because I can't do it, I just don't have the skill mastered yet. Plus, as you will quickly learn, I love, love, LOVE, flowers ~ I even make my own Fantastical Flowers as I mentioned yesterday. (You'll be able to purchase them here on my site soon!) My favorite flowers are daisies, especially Gerbera Daisies with all their layers and bright, bold, and blending colors. Though I have noticed there is a big rose trend in the Face & Body Painting world these days, especially because of the invention of split cakes and their ease of use. Well, painting daisies is not so much of a challenge for me ~ I paint them all the time, just because they're so fun and aside from a round brush, Filberts are my favorite. :) Now back to the roses... I'm not so good at painting those, especially with split cakes. (Not yet anyway, but I'll get there...) I can draw them and paint them with acrylic paint, but as speed is a big thing in the face painting world, it's important that I practice getting roses down using split cakes to assist in the speed factor. Enter the Fleur cake and also the new Loew-Cornell 3/4 Flat Brush I got in the mail today too (also from Silly Farm) that will replace one of the crummy flat brushes I have. Being so excited about my new arrivals in the mail today, I chose to forego a New Years Eve theme and do something floral instead. Well, working with that new brush & cake just wasn't the easiest for me. First off, new brushes are always stiff, and secondly, new cakes take a bit of use before they, too, are broken in properly. But, I gave it the old college try anyway and chose to go big or go home... My new 3/4" flat brush in hand, I set off to conquer a rose. Everything was working out well in the beginning~ Got my ruffly background petals in, and the center cylindrical shape came together nicely, even the side swipes to the center cylinder came in nicely too~ it was just that the center pieces ended up being a little too off center from the background petals to look like a rose ~ It sort of just looked like a ruffly mess. Being my fathers' daughter however; I chose to work with my mistake rather than start over. My father is a wise man and I get the majority of my artistic chops from him. He's a retired Art Director and Professor of Graphic Design, thus I was working part time in his office during my summers off from school by the time I was 13. Dinner conversations consisted of creating fictitious ad campaigns or products; or even discussing color theory and layout design... There was really never a dull moment at our dinner table. One summer day, when I was working in his office, I was wasting some time drawing while I waited for him to finish his work for the day. While drawing with a technical pencil, I made a mistake. So, as anyone would do when they make a mistake, I went in search of an eraser. Not to bother my father while he was working, I was going in and out of each employees taboret tables looking for an eraser; none was to be found. Finally, I decided to interrupt my father and ask where I could find an eraser and he says, "We don't have erasers here." Looking at him all confused he continued, "To be a really good artist, one of the best skills you can have is to WORK with your mistakes, not eliminate them. So I have a rule that there are no erasers in the office." Looking completely dumbfounded and probably like an ashamed daughter for even bringing up the subject, he proceeded to put his hand on my shoulder and say, "Go back to your drawing, take a look at it and just consider what you can make of the mistake you made. You don't need an eraser, just use your imagination. I bet it will turn out better than you expected." Thus, I sauntered back over to my drawing area and stared at my picture. Sure enough, after a few minutes of gazing at the thing, I found a way to incorporate the mistake into the drawing. We soon left the office for the evening, and I left the completed drawing on the draft table I had been working at. A week later when I came back with my father to help in his office, I was pleasantly surprised that he had my drawing hanging on his office wall along with all of his own amazing work. "You see?" my father asked me, "It's spectacular! I bet it wouldn't have turned out like this if you hadn't made that mistake." Giving me a little wink and pat on the back. And he was right... Now, getting back to the whole daily doodle and rose thing... So, I made a mistake when I first painted the rose; but rather than wiping it off my arm and starting over; I could hear my father saying~ "You don't need an eraser, just use your imagination." and so that's what I did for tonight's doodle. BEHOLD, the last Daily Doodle of 2014 (Along with a pic of the paints I used: Paradise Prisma Cake in Fleur, and Wolfe Black & White.)...
With that, I wish you all a Happy New Year and hope that your 2015 is Wonderfully Fantastical!
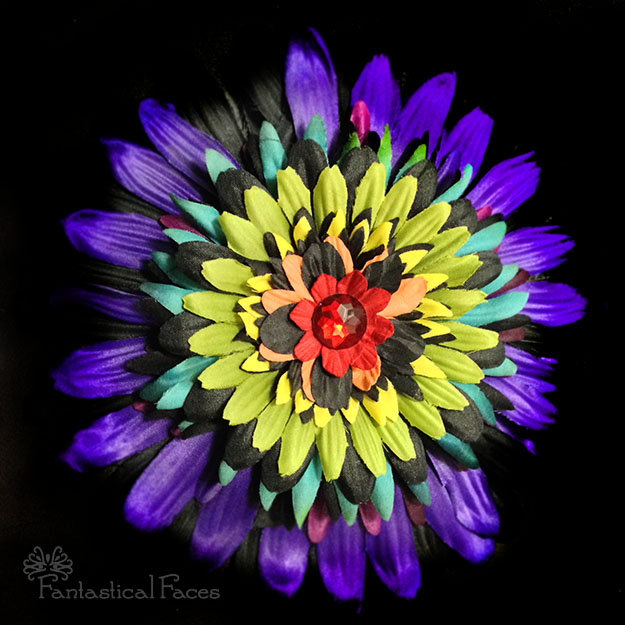
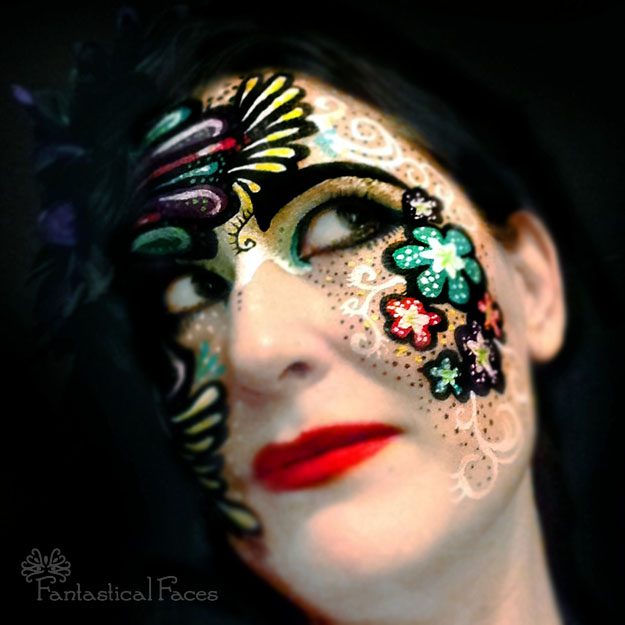
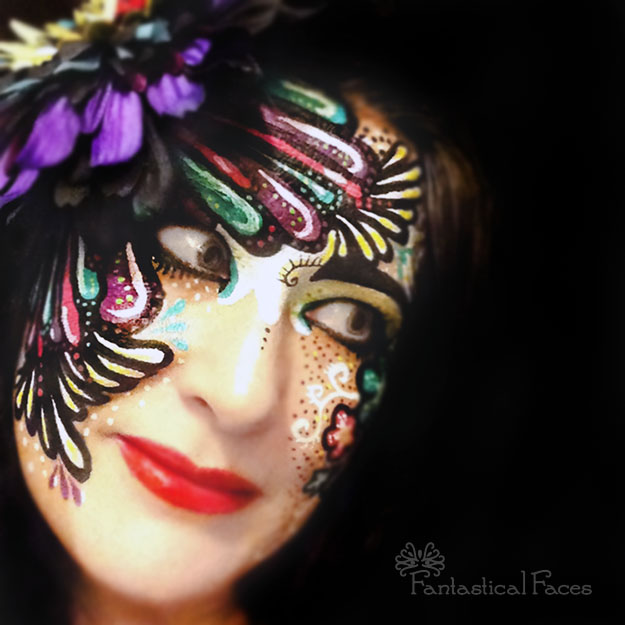
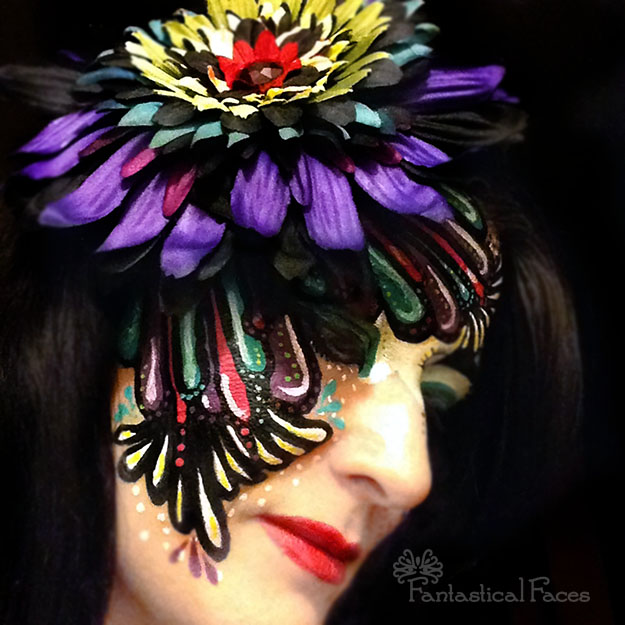
(Oh, and don't forget~ Throw away your erasers, your imagination will do the work for you!) Keep Creating, Keep Smiling, and Keep Dreaming~ -tif- Hello everyone~ I was finally feeling well enough to provide you with a Daily Doodle using a design on my face tonight. I used my favorite arsenal of Wolfe paints, Loew-Cornell & Royal Majestic Round Brushes, and of course, one of my handmade, signature "Fantastical Flowers" which will be popping up on this site for sale in the upcoming weeks. (For those of you who know me personally, you know I never leave the house without one on.) Originally called "Nifties by Nadia"; I have chosen to incorporate the flowers into my face painting business as they just work so well with painted faces and whimsical designs. The little princesses and fairies out there love them too!) My inspiration came from the flower itself; as it is a larger flower that hugs the side of the face, I chose to continue the flower design with paint on my face to make it all work nicely together. I used flat paint, no metallic paints, glitter, or gems, the only exception was adding some Wolf pearly white on my eyelids which give off a somewhat sparkly warm gold in the photos.
A you can see, I chose to mimic the petals in the Fantastical Flower; having the painted petals cascade down my face and lining them with a heavy black to create the illusion the flower's black underside petals.
This was one I just sort of winged tonight. It was fun to play around and get back up to speed with painting on my face again. Having been sick the past week or so, and painting solely on my arm, admittedly it was a bit weird at first re-adjusting to painting myself in a mirror, especially with painting the far sides of my face that you can't see so well in the mirror. It was fun nonetheless, and I'm pretty excited about this one, and to finally present a painted face in my Daily Doodles for you. I'm also working with some new lighting and angles that will become more perfected as time goes on, as I want to present the best pictures I can for you to enjoy. :) With that, I wish you all a Happy Early New Years Eve! See you tomorrow with another Daily Doodle! Baubles, Bangles, Bubblegum & Glitter Galore~ -tif- |
AuthorWrite something about yourself. No need to be fancy, just an overview. Archives
March 2015
Categories |


 RSS Feed